Nodes, Materials, and Tools
Publish Date: 2022-01-06
VAT Tool
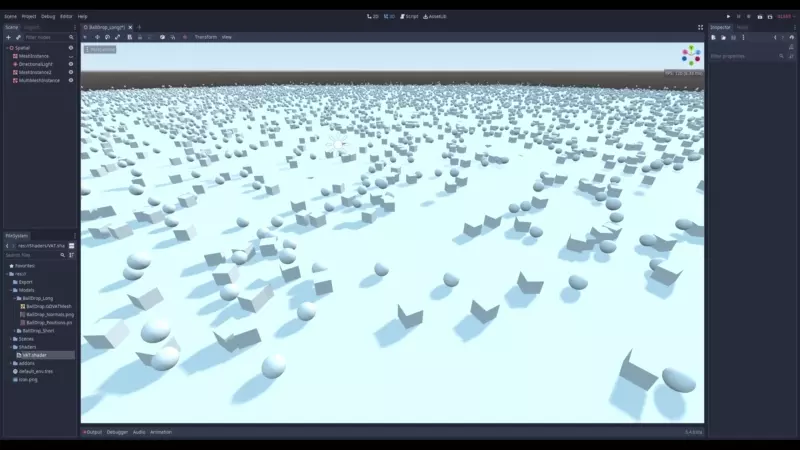
Vertex Animation Textures or VAT for short is textures that contains a sequence of Position and Normal data encoded into it. Although other data can also be encoded as well. This allows skeletal animations or fluid simulations to be contained into a couple of textures. Instead of going through the standard way of importing animation into your software, you read the textures in a shader and process the animations on the GPU. This method is much more performant then standard methods such as CPU side skinning, this means instead of 100 animated actors on screen you could 10s of thousands in Realtime. It does have its downsides though, One of the bigger downsides is the lack of advanced animation blending, this usually means you need to compensate by modifying your art pipeline. So this method might not the best for your hero characters but when you need lots of actors with animation, like in an RTS, this method is very valuable. Its also useful for animations that are standalone and don't need to blend into any other animation such as a fluid simulation. VATTool is a tool that allows you to create VAT's from .obj sequences and preview them. Feature list below Export a Vertex animation texture from a sequence of objs Allows previewing of exported VATs directly in the software Command Line or GUI Export to other software
The software has let and is letting me learn so much as I continue developing it for an eventual release on Github. This was the first time have wrote a renderer from scratch. Which was a very good experience as it has allowed me to understand so much more in the world of rendering. It also taught me a lot about patience and when to step back from a project. VATTool is written in C# using mainly two libraries Veldrid, a low level platform agnostic graphics abstraction and ImageSharp, which is a pure C# library for manipulating images. Other components that were developed along side the main tool is an addon and shader for Godot which allows importing files VATs from VATTool. Initially it was only supposed to be a shader but it turns out Godot manipulates imported meshes, which caused the VATs to break. So, I had to write my own importer. Shaders were very interesting to write and I got experience in two different languages as I had to write two shaders to display the VATs. One for Godot and one for the internal VATTool Renderer. I used lots of different sources to help with various but using them in my own project really helped me understand them better. Below is the Godot shader written in Godot's shading language which is similar to glsl. The internal shader is basically the same minus some Godot specific stuff.
shader_type spatial;
render_mode cull_disabled;

uniform sampler2D PositionTex;
uniform sampler2D NormalTex;
uniform float bounds_min;
uniform float bounds_max;
uniform float Speed = 5.0;
uniform float Time_Offset = 0.0;
uniform bool RandomTimeOffset = false;

uniform sampler2D AlbedoTex : hint_albedo;
uniform sampler2D _NormalTex : hint_normal;
uniform float NormalStrength;
uniform sampler2D ORMTex : hint_white;
uniform float AO_LightAffect;


float RemapRange(float value, float from1, float to1, float from2, float to2){
    return (value - from1) / (to1 - from1) * (to2 - from2) + from2;
}

float DecodeFloatRG (vec2 enc){
  vec2 kDecodeDot = vec2 (1.0, 1.0 / 255.0);
  return dot(enc, kDecodeDot);
}

vec2 OctWrap( vec2 v )
{
    vec2 p1 = vec2(1.0f, 1.0f) - abs(vec2(v.y, v.x));
    vec2 p2 = vec2(0, 0);

    if (v.x >= 0.0f){
        p2.x = 1.0f;
    }
    else{
        p2.x = -1.0f;
    }

    if (v.y >= 0.0f){
        p2.y = 1.0f;
    }
    else{
        p2.y = -1.0f;
    }

    return p1 * p2;
}

vec3 Decode( vec2 encN )
{
    encN = encN * 2.0 - 1.0;

    vec3 n;
    n.z = 1.0 - abs( encN.x ) - abs( encN.y );
    n.xy = n.z >= 0.0 ? encN.xy : OctWrap( encN.xy );
    n = normalize( n );
    return n;
}

float rand(vec2 co){
    return fract(sin(dot(co, vec2(12.9898, 78.233))) * 43758.5453);
}

void vertex(){

	float _TimeOffset = Time_Offset;
	_TimeOffset = (rand(vec2(float(0), float(INSTANCE_ID))) * Time_Offset) * float(RandomTimeOffset); //Only works with instances, like from multimesh


	ivec2 texSize = textureSize(PositionTex, 0);
	float vertCoords = RemapRange(float(VERTEX_ID) + 0.5, 0, float(texSize.x), 0.0, 1.0);
	vec4 _AnimVertexTex_TexelSize = vec4 (Speed / float(texSize.x), Speed/ float(texSize.y), float(texSize.x), float(texSize.y));
	float animCoords = fract((TIME + _TimeOffset) * _AnimVertexTex_TexelSize.y);
	vec2 texCoords = vec2(vertCoords, animCoords);
	vec4 texPosition = textureLod(PositionTex, texCoords, 0.0f);
	vec4 normalPosition = textureLod(NormalTex, texCoords, 0.0f);

	vec3 ActualPos;
	ActualPos.x = DecodeFloatRG(texPosition.rg);
	ActualPos.y = DecodeFloatRG(texPosition.ba);
	ActualPos.z = DecodeFloatRG(normalPosition.rg);

	ActualPos.x = RemapRange(ActualPos.x, 0.0f, 1.0f, bounds_min, bounds_max);
    ActualPos.y = RemapRange(ActualPos.y, 0.0f, 1.0f, bounds_min, bounds_max);
    ActualPos.z = RemapRange(ActualPos.z, 0.0f, 1.0f, bounds_min, bounds_max);

	vec4 FinalPos = vec4(ActualPos, 1.0);

	VERTEX = FinalPos.xyz;

	vec3 decNormal = Decode(normalPosition.zw);
	NORMAL = decNormal;

}

void fragment(){
	vec4 albedo = texture(AlbedoTex, UV);
	ALBEDO = albedo.rgb;
	ALPHA = albedo.a;

	NORMALMAP = texture(NormalTex, UV).rgb;
	NORMALMAP_DEPTH = NormalStrength;

	vec4 orm = texture(ORMTex, UV);

	AO = orm.r;
	AO_LIGHT_AFFECT = AO_LightAffect;

	ROUGHNESS = orm.g;
	METALLIC = orm.b;

}
Procedural Generation
This project was all about Procedural Generation in Godot for levels. It works well and the gaps between rooms in the video is because the two sets are not designed to work together. The other thing you might notice is right after generating a level individual rooms start to blink. This is the result of the Runtime GI baking. This is actually one of my favorite projects do to its potential and and I want to use this tool to make a small game eventually. Its almost ready to be used in a game is well. The big thing needed was occlusion culling as most of the rooms will not be visible at any given moment. So, rendering all of the ones in the camera view is wasteful. I thought about implementing my own occlusion culling system but decided not too since the next version of Godot was going to include one anyway. Well its been almost a year and that version is out. In that version their is a portal based occlusion culling system which is perfect for this. The other things needed was navmesh for AIs. The issue is that Godot currently does support baking a navmesh at runtime so I would have to write my own baker. With that I'm back in the same boat as the last issue, the next version of Godot supports this. However, this time the feature is merged into the dev branch so I can just compile it.
Cell Shading
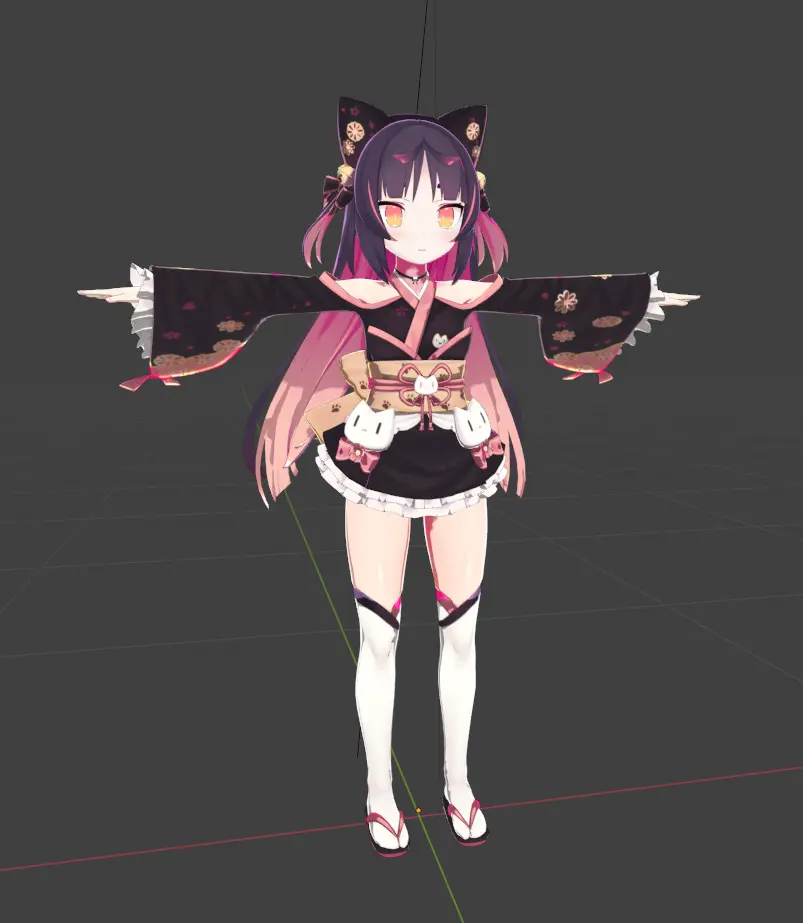
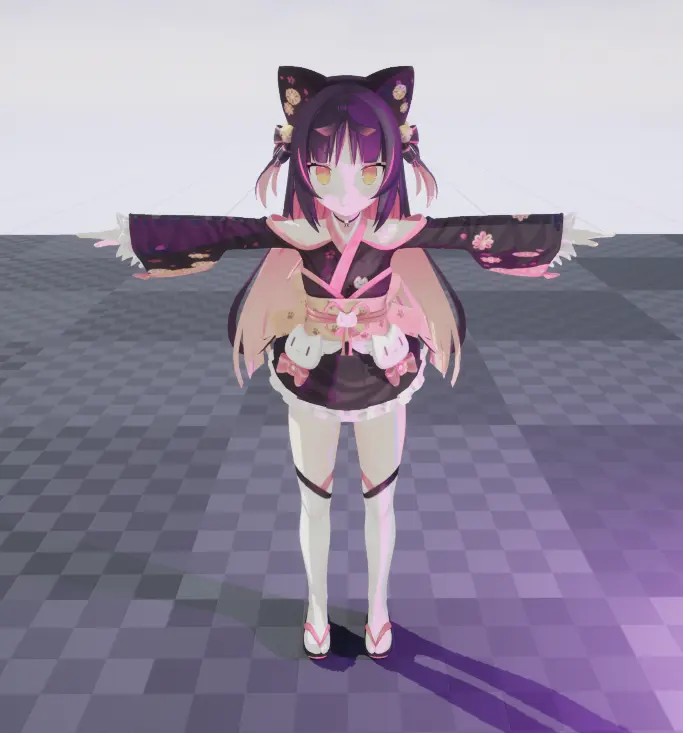
I love playing around with anime models like the one I got off the internet. Most of these models are for unity or mmd but I love using blender so naturally I needed to get the models looking good their as well. The Eevee rendering engine in blender is perfect for that and with the node editor in my hands I created a toon shader which I think looks good. I also added a outline by duplicate the model, "expanding" it then inverting the normals.
When I started to learn Unreal I wanted to make an Anime aka a cell shader as one of my first projects. So I googled around for different approaches and found an article about post processing shaders. I chose this option because the demonstrated result looked good and it did not require recompiling the engine like a new shading model would have. As my goal I had two things that I wanted to have in the final result. 1. I wanted it to look good and be able to respond to multiple lights. 2. I wanted to use NPR rendering for selected objects and then have the rest of the scene be rendered with standard PBR. As a post process shader it
UE5 Chains
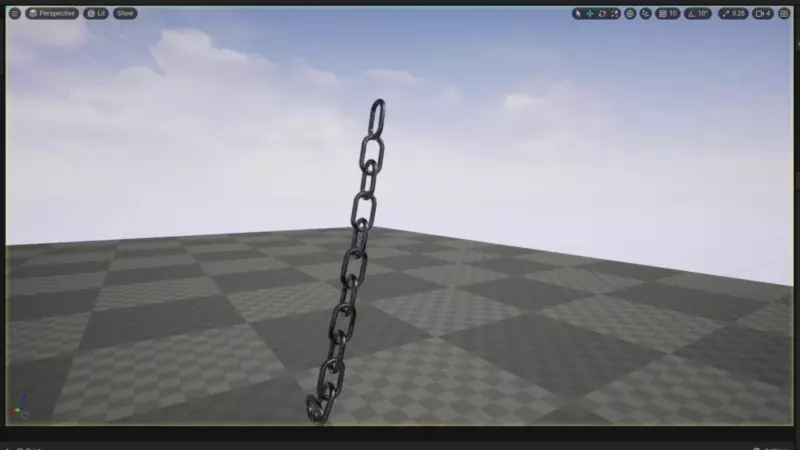
This was a quick experiment to see if chains could be implemented on top off the cable tool in UE5. It works pretty well but it does have some issues the big one is that after large motion the chain will flip back and forth, the other is a programming error which does not affect the simulation but spams errors. This project was fun to work on and would make a nice free plugin for the marketplace, so, I would like to return to it and finish it. The two errors above would need to be fixed but further more I would like to make it more user friendly and improve performance. To make it more user friendly I want to implement I interface that would allow easy building of the chain without having to modify the blueprint. For performance I have a couple ideas such as only simulating the chain when the player is within a certain distance, freezing the chains when they are not in view, and disabling chains until a collision activates them.
